How to
Create Repair Estimate?
Container damaged during
transit, needs to be repaired before they are onhired.
The Repairing of the damages are done at the depot and that activity is
referred as Repair Estimate. There are two submenu of Repair Estimate –
Creation and Revision. Creation is for generating or creating the Original
Repair Estimate, while Revision is for revising the Estimate that was
previously submitted.
Action Steps:
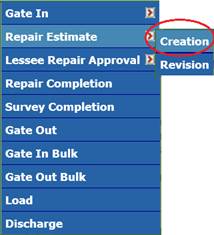
- Click the “Operations -> Repair Estimate ->
Creation” from the main menu as shown below:
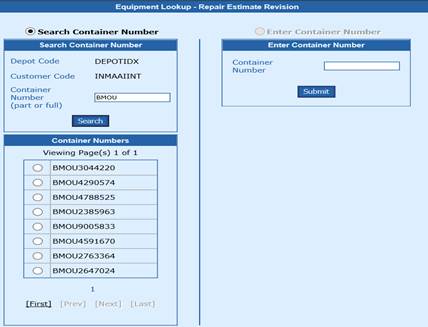
- In the lookup
screen for Repair Estimate, click the Search button to view the list of
pending Estimate units. All the units that are Gated in with Damage
status will appear in pending of Repair Estimate lookup screen as below:
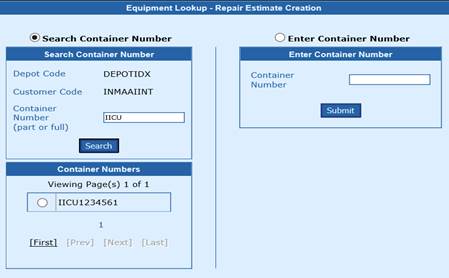
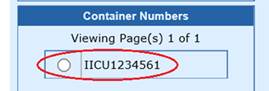
- Choose
the container number from the list, which you would want to create the
repair estimate.

- The Repair
Estimate screen will appear for the container as below
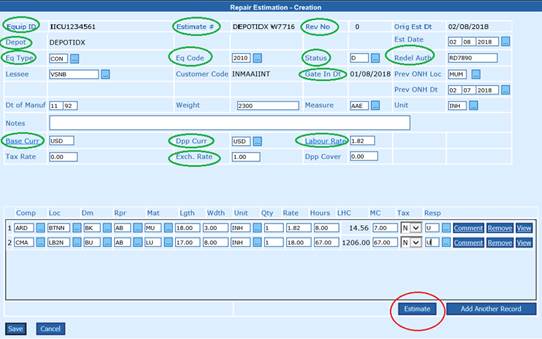
The Container number,
Estimate Number, etc that are circled in green colour
will appear by default. These information are automatically populated from the
Gate In page. All the other fields has to updated by
the depot user, basis the requirement of the asset owner.
- Est date: Enter the
date when the repair was done and press the tab key
- Status: Select the
Status from the lookup screen and press the Tab key. For Repair Estimate status, only D and E are allowed.
All other status will be rejected
- Lessee: Select the
Customer/Lessee code from the lookup screen and press the Tab key.
- Prev ONH Loc: Select the
previous on hire location from the lookup screen and press the tab key
- Prev ONH Date: Select the previous on hire date from the lookup screen and press
the tab key
- Dt of Manuf: Enter the date of Manufacture date in
MM/YY format and press the Tab key
- Weight: Enter the weight of the
container and press the Tab key
- Measure: Select the Measure from the lookup screen and press the Tab key
- Unit: Select the Unit of measure from the lookup screen and press the
Tab key
- Notes: Enter the Notes or remark for that repair and press the Tab key
Comp, loc, Dm, Rpr, Mat, Lgth,
Wdth, Unit, Qty, Rate,
Hours, MC, tax and Resp are the
item lines details of the damages for that container.

- Comp: Select the Component code from the lookup screen and press the
Tab key
- Loc: Select the Location code from the lookup screen and press the
Tab key
- Dm: Select the Damage from the lookup screen and press the Tab key
- Rpr: Select the repair code from the lookup screen and press the Tab
key
- Mat: Select the repair code from the lookup screen and press the Tab
key
- Lgth: Enter the length of the damage and press
the Tab key
- Wdth: Enter the Width of the damage and press
the Tab key
- Unit: Select the Unit of measure from the lookup screen and press the
Tab key
- Qty: Enter the Quantity and press the Tab key
- Rate:
By default the labour rate which is set in the
main menu Settings, will be shown. If any item lines does not match the
rate, the user can manually enter the labour
rate and press the Tab key.
- Hours: Enter the Labour hour(s) and press
the Tab key
- LHC: It is read only field. It calculates the two fields - Labour Rate and Hour
- MC: Enter the Material Cost and press the Tab key
- Tax: Select the tax rule to be applied for the line item. L=Labour, M=Materiail, N=None
or no tax, B=Both. Select the applicable tax and press the Tab key
- Resp: Select the Responsibility party from the
lookup and press the Tab key
- Comment: Enter the comments for that line item and press the Tab key
- Remove: To delete or remove that line item, click the Remove button and
press the Tab key
- View: To view the description of the damage details, click the view
button and press the Tab key.
- Add Another Record: To add new row or new item lines, click
the Add another Record and press the tab key. The maximum limit of item
lines per container is 99 lines.
- Estimate: Before saving the Repair Estimate, the totals for each
responsibility party has tobe estimated or
calculated. That calculation is done nu clicking the “Estimate” button. On
clicking the button, the summary of the item lines will be automatically
calculated and the summary for each Responsibility party would be shown.
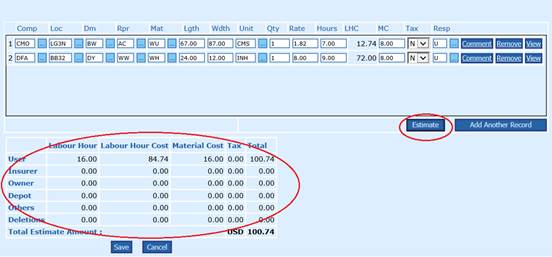
- Save: To save the repair estimate, click the Save button.
How to
send an email estimate?
The Estimates that are prepared or saved can be
send by an email to the Customer/Lessee/Surveyor/etc
at a click of a button.
Action Steps:
- In the print page of the Estimate or from
Tracking page, an Email icon will be available in the top right corner and
in the right side of the body as shown below:
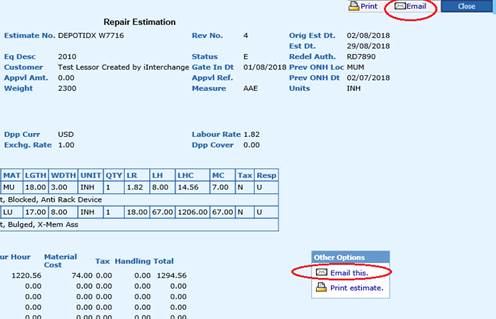
- On clicking
the icon “Email this”, the user
will be prompted to enter the “From”
and “To” email address.
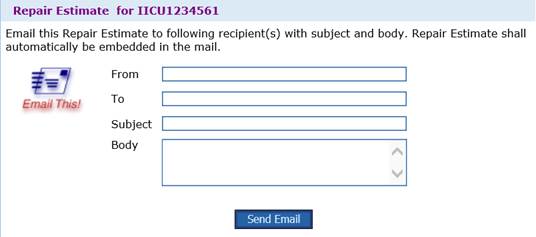
- The
recipient will received the Estimate page as an attachment in html format.
How to
Create Repair Estimate Revision?
A repair estimate once
it is saved will be updated to the asset owner. But, for any reason if it
requires a modification or revision after being saved, then system has the
facility to modify the estimate.
Action Steps:
- Click the “Operations -> Repair Estimate ->
Revision” from the main menu as shown below:

- In the lookup
screen for Repair Estimate, click the Search button to view the list of
pending Estimate units. All the units that are Repair Estimated will
appear in pending of Repair Estimate lookup screen as below:
- Choose
the container number from the list, which you would want to revise the
repair estimate.
- The Repair
Estimate screen will appear for the container as below. Each time an
estimate is revised, the revision number will automatically increase by 1.
A maximum of 9 times, an estimate can be revised.
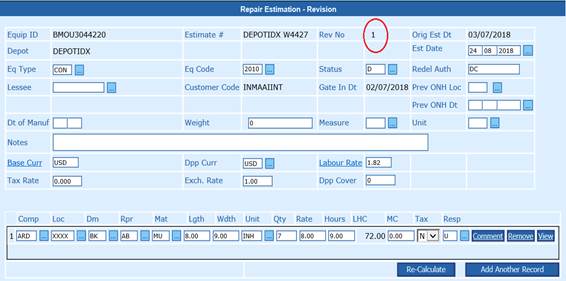
- All the fields
will be automatically populated with the latest estimate
data/information/amount.
- Any of the
field(s) can be revised or edited.
- Re-Calculate: Before saving the revised estimate, click
on the ‘Re-Calculate’ button to get the revised
line items total summary. On clicking the button, the summary of the item
lines will be automatically calculated and displayed for each
Responsibility party.
- Save: To save the revised repair estimate, click the Save button.